SecurityContextRepository
• 스프링 시큐리티에서 사용자가 인증을 한 이후 요청에 대해 계속 사용자의 인증을 유지하기 위해 사용되는 클래스이다
• 인증 상태의 영속 메커니즘은 사용자가 인증을 하게 되면 해당 사용자의 인증 정보와 권한이 SecurityContext에 저장되고 HttpSession 을 통해 요청 간 영속이 이루어 지는 방식이다
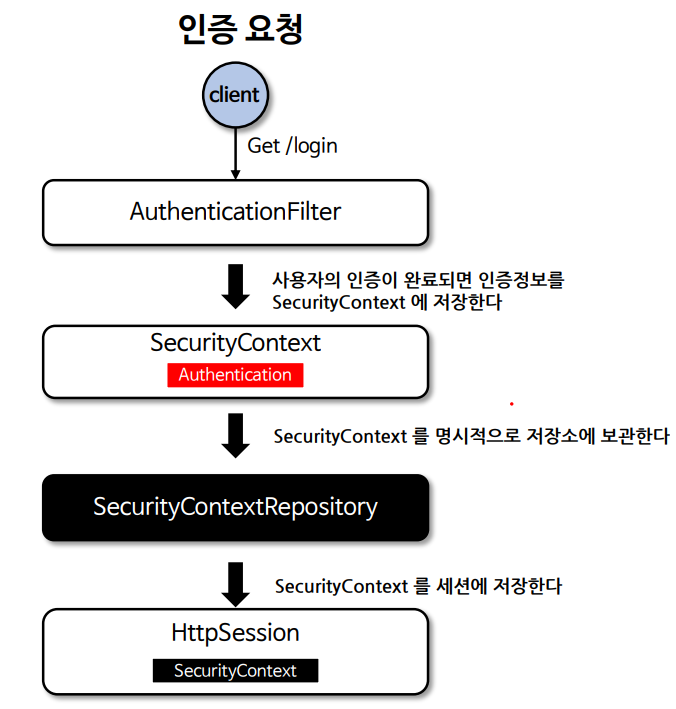
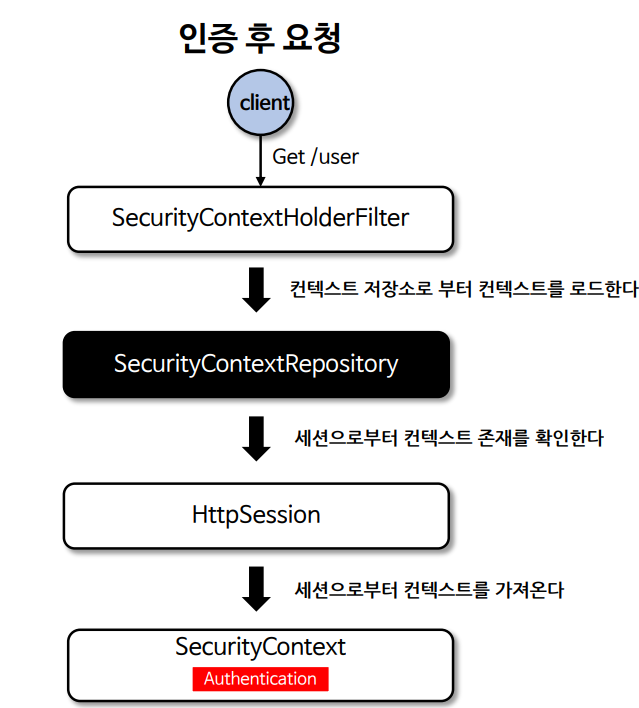
구조

SecurityContextRepository 구현체 3가지
• HttpSessionSecurityContextRepository
요청 간에 HttpSession 에 보안 컨텍스트를 저장한다. 후속 요청 시 컨텍스트 영속성을 유지한다
• RequestAttributeSecurityContextRepository
ServletRequest 에 보안 컨텍스트를 저장한다. 후속 요청 시 컨텍스트 영속성을 유지할 수 없다
• NullSecurityContextRepository
세션을 사용하지 않는 인증(JWT, OAuth2) 일 경우 사용하며 컨텍스트 관련 아무런 처리를 하지 않는다
• DelegatingSecurityContextRepository
RequestAttributeSecurityContextRepository 와 HttpSessionSecurityContextRepository를 동시에 사용할 수 있도록 위임된 클래스로서 초기화 시 기본으로 설정된다
SecurityContextHolderFilter
• SecurityContextRepository 를 사용하여 SecurityContext를 얻고
이를 SecurityContextHolder 에 설정하는 필터 클래스이다
• 이 필터 클래스는 SecurityContextRepository.saveContext()를 강제로 실행시키지 않고
사용자가 명시적으로 호출되어야 SecurityContext를 저장할 수 있는데
이는 SecurityContextPersistenceFilter 와 다른점이다
• 인증이 지속되어야 하는지를 각 인증 메커니즘이 독립적으로 선택할 수 있게 하여
더 나은 유연성을 제공하고 HttpSession 에 필요할 때만 저장함으로써 성능을 향상시킨다
SecurityContext 생성, 저장, 삭제
1. 익명 사용자
• SecurityContextRepository 를 사용하여 새로운 SecurityContext 객체를 생성하여
SecurityContextHolder 에 저장 후 다음 필터로 전달
• AnonymousAuthenticationFilter 에서 AnonymousAuthenticationToken 객체를 SecurityContext 에 저장
2. 인증 요청
• SecurityContextRepository 를 사용하여 새로운 SecurityContext 객체를 생성하여
SecurityContextHolder 에 저장 후 다음 필터로 전달
• UsernamePasswordAuthenticationFilter 에서 인증 성공 후 SecurityContext 에 UsernamePasswordAuthentication 객체를 SecurityContext 에 저장
• SecurityContext를 SecurityContextHolder에 저장
[하나의 요청을 처리하는 동안 SecurityContextHolder.getContext()를 통해 언제든 현재 스레드에서 설정된 인증 정보를 확인 가능]
• SecurityContextRepository 를 사용하여 HttpSession 에 SecurityContext 를 저장
요청이 모두 처리되고, 서버가 클라이언트에게 응답을 보낸 후,
Spring Security는 SecurityContextHolder.clearContext()를 호출하여 해당 요청에서 사용된 SecurityContext를 정리
이렇게 하면 다음 요청에서 새로운 SecurityContext가 설정될 수 있다.
3. 인증 후 요청
• SecurityContextRepository 를 사용하여 HttpSession 에서 SecurityContext 꺼내어
SecurityContextHolder에 저장 후 다음 필터로 전달
• SecurityContext 안에 Authentication 객체가 존재하면 계속 인증을 유지한다
익명사용자인 경우?
Spring Security에서 인증(Authentication)은 반드시 사용자가 로그인했을 때만 해당하는 것이 아닙니다.
익명 사용자 역시 Authentication 객체로 처리되며, 인증된 사용자와 유사한 방식으로 인증 상태를 유지할 수 있습니다.
다만, 익명 사용자에게는 AnonymousAuthenticationToken이 사용되며, 이 객체를 통해 익명 사용자를 구분합니다.
4. 클라이언트 응답 시 공통
• SecurityContextHolder.clearContext() 로 컨텍스트를 삭제 한다 (스레드 풀의 스레드일 경우 반드시 필요)
어떻게 세션이나 쿠키에 SecurityContext를 저장하는가?
Spring Security에서 `SecurityContext`는 **HttpSession**이나 **쿠키** 같은 저장소에 저장되며, 이를 통해 인증된 사용자의 세션이 유지됩니다. 기본적으로 Spring Security는 **HttpSession**을 사용하여 `SecurityContext`를 저장하고 관리합니다.

### HttpSession에 SecurityContext를 저장하는 과정

Spring Security에서 `SecurityContext`를 HttpSession에 저장하고 불러오는 과정은 주로 **`SecurityContextRepository`** 인터페이스를 통해 이루어집니다. 이 중 기본 구현체인 **`HttpSessionSecurityContextRepository`**가 HttpSession을 통해 `SecurityContext`를 저장하고 불러오는 역할을 담당합니다.

### 1. 인증 시 HttpSession에 저장

- 사용자가 로그인에 성공하면, 인증된 `Authentication` 객체를 담은 `SecurityContext`가 생성됩니다.
- 이 `SecurityContext`는 요청 처리 중에 `SecurityContextHolder`에 저장됩니다.
- 이후 `SecurityContextPersistenceFilter`에서 해당 `SecurityContext`를 `HttpSession`에 저장합니다.

예시:

SecurityContext context = SecurityContextHolder.getContext();
session.setAttribute("SPRING_SECURITY_CONTEXT", context

- 여기서 `SPRING_SECURITY_CONTEXT`는 기본적으로 사용되는 세션 속성 이름입니다. 이 값에 `SecurityContext` 객체가 저장됩니다.

### 2. 이후 요청 시 HttpSession에서 불러오기

- 사용자가 다시 요청을 보내면, Spring Security는 `SecurityContextRepository`를 사용하여 **HttpSession**에서 저장된 `SecurityContext`를 읽어옵니다.
- `SecurityContextPersistenceFilter`가 실행될 때, 세션에서 `SecurityContext`를 불러오고, 이 값을 `SecurityContextHolder`에 설정합니다.

예시:
SecurityContext context = (SecurityContext) session.getAttribute("SPRING_SECURITY_CONTEXT");
if (context != null) {
    SecurityContextHolder.setContext(context);
}

### 쿠키에 SecurityContext를 저장하는 방법

기본적으로 Spring Security는 `SecurityContext`를 **쿠키에 저장하지 않습니다**. 쿠키는 주로 세션 ID를 저장하고, 그 세션 ID를 기반으로 서버에서 사용자 정보를 조회하는 방식으로 동작합니다. 하지만 만약 인증 상태를 쿠키에 저장하고 싶다면, **JWT(JSON Web Token)** 같은 토큰 기반 인증 방식을 사용할 수 있습니다.

#### JWT와 같은 토큰을 쿠키에 저장하는 방법 (대안)

1. **사용자 인증 시**: 인증에 성공하면, 서버에서 JWT 토큰을 생성하고, 이를 **쿠키**에 저장합니다.
2. **이후 요청 시**: 클라이언트는 쿠키에 저장된 JWT 토큰을 서버로 보내고, 서버는 이 토큰을 검증하여 사용자를 인증합니다.

예시:
Cookie jwtCookie = new Cookie("JWT_TOKEN", token);
jwtCookie.setHttpOnly(true); // 클라이언트 스크립트로 접근 불가
jwtCookie.setSecure(true); // HTTPS 연결에서만 쿠키 사용
response.addCookie(jwtCookie);

이 방식은 세션을 유지하지 않고 **stateless**한 인증을 제공하므로, 분산 시스템에서 더 효율적일 수 있습니다. 다만, 이 경우에는 `SecurityContext` 자체가 쿠키에 저장되는 것이 아니라, JWT 토큰을 통해 인증 정보가 재구성됩니다.

### 정리

- **HttpSession에 SecurityContext를 저장하는 기본 방식**은 `HttpSessionSecurityContextRepository`가 `SecurityContext`를 HttpSession에 저장하고, 요청 시 불러오는 역할을 합니다.
- **쿠키에 SecurityContext를 저장하지는 않지만**, JWT 같은 토큰을 사용하여 쿠키를 통한 인증을 구현할 수 있습니다.
SecurityContextHolderFilter 흐름도
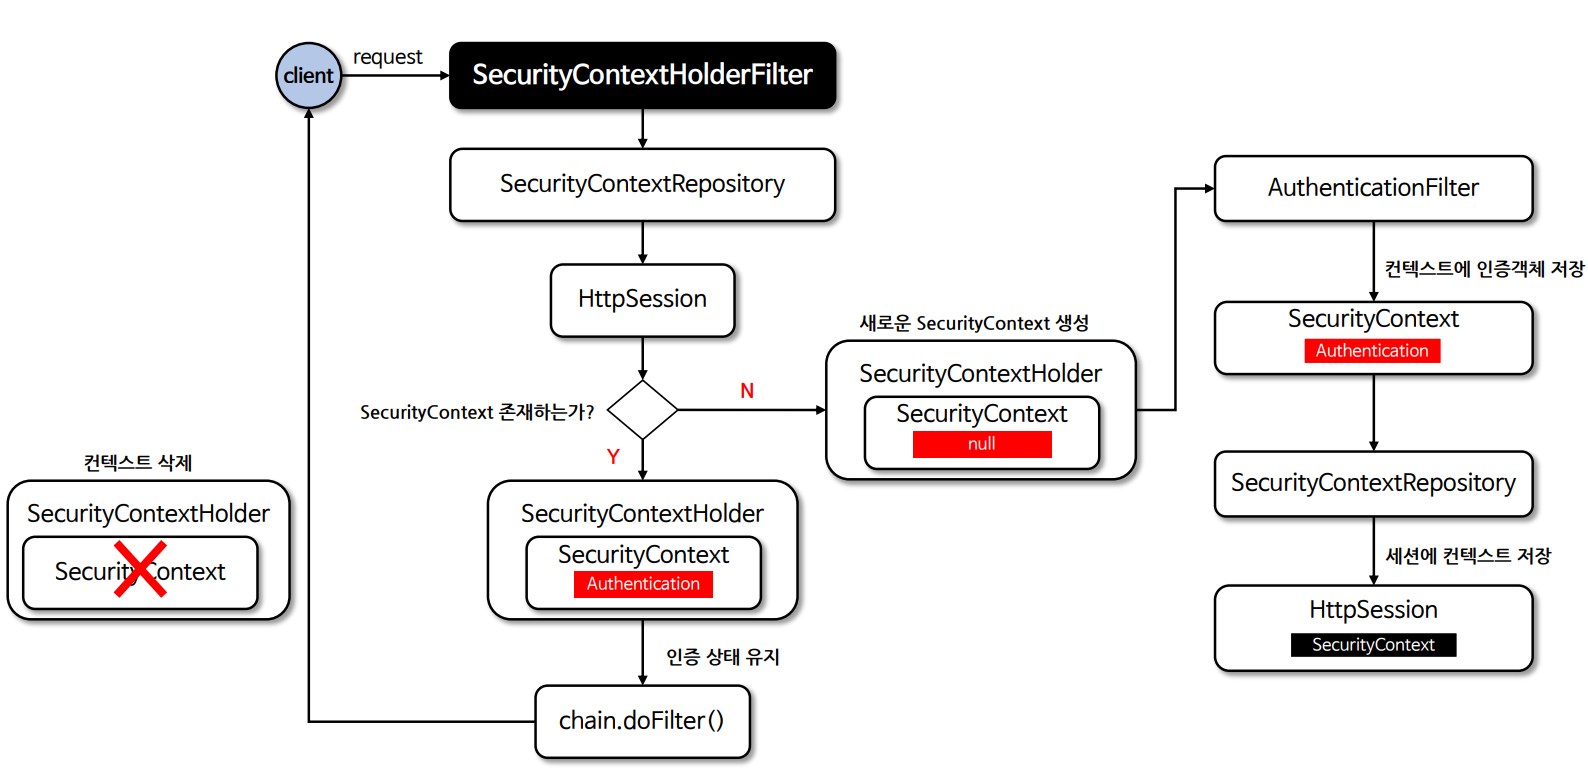
SecurityContextHolderFilter
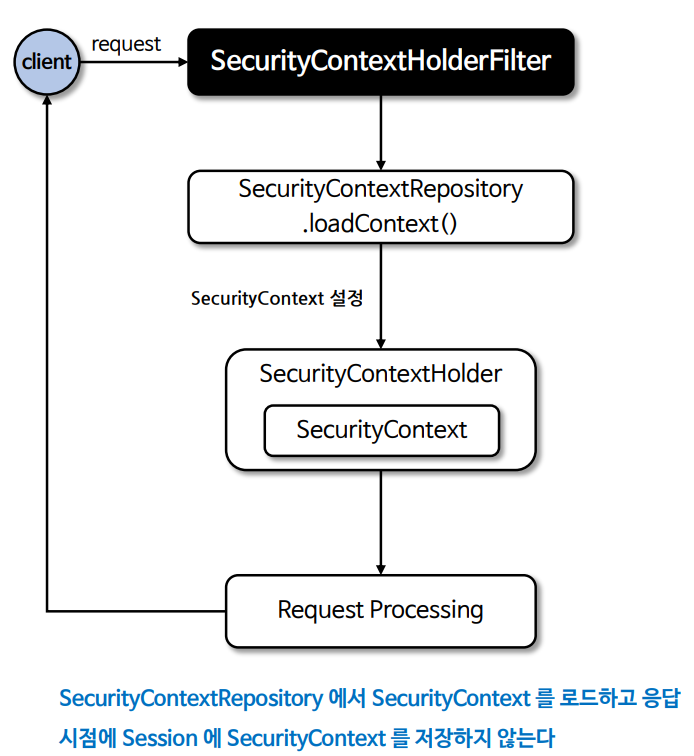
SecurityContextPersistanceFilter
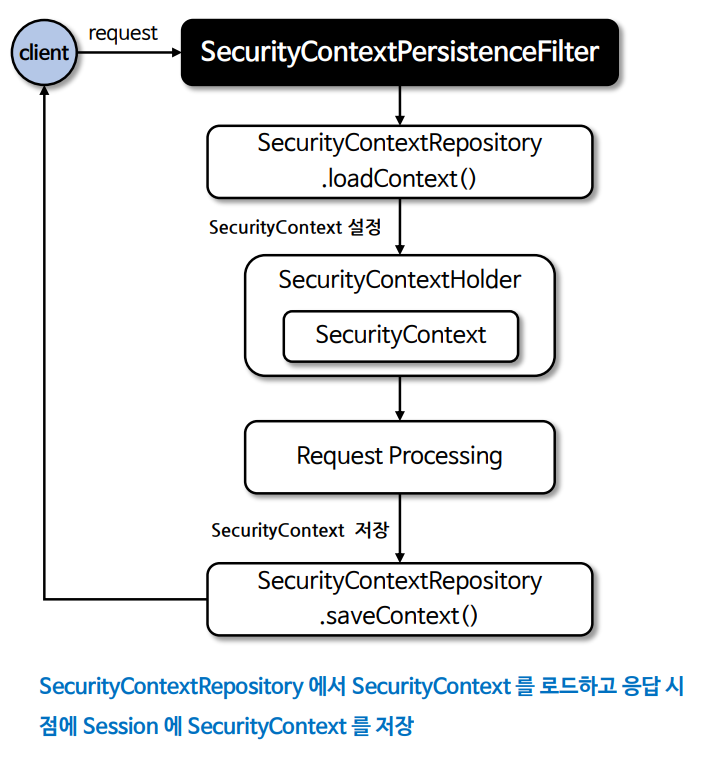
- SecurityContextPersistenceFilter는 세션을 통해 인증 정보를 저장하고 관리하는 방식으로, 모든 요청에 대해 SecurityContext를 세션에서 불러오고, 인증된 사용자라면 다시 세션에 저장하는 방식입니다.
- 이는 세션 상태 유지로 인한 성능 문제, 분산 시스템에서의 비효율성, 그리고 서버 부하와 같은 사이드 이펙트를 초래할 수 있습니다.
- SecurityContextHolderFilter는 이러한 문제점을 해결하고, stateless한 인증 처리 방식과 더 잘 맞는 방식으로 SecurityContext를 관리하기 위해 도입되었습니다.
- 세션을 사용하지 않고, 필터 체인 내에서 SecurityContext를 설정하고 정리하는 방식으로 동작하며, 성능 향상과 확장성을 제공하는 장점이 있습니다.
이러한 변화는 세션 사용에 따른 문제점을 해결하고, 특히 JWT와 같은 토큰 기반 인증 방식에 더 유연하게 대응할 수 있도록 하기 위한 개선입니다.
securityContext() API
@Bean
public SecurityFilterChain securityFilterChain(HttpSecurity http) throws Exception {
    http.securityContext(securityContext -> securityContext
            .requireExplicitSave(true)); // SecurityContext 를 명시적으로 저장할 것이지 아닌지의 여부 설정, 기본값은 true 이다
                                        // true 이면 SecurityContextHolderFilter, false 이면 SecurityContextPersistanceFilter 가 실행된다
    return http.build();
}
현재 SecurityContextPersistanceFilter 은 Deprecated 되었기 때문에
레거시 시스템 외에는 SecurityContextHolderFilter 를 사용하면 된다
requireExplicitSave(true)의 의미
- requireExplicitSave(true)는 Spring Security가 SecurityContext를 자동으로 저장하지 않고, 명시적으로 저장하도록 설정하는 기능입니다.
- 기본적으로, SecurityContext는 요청이 끝날 때 자동으로 세션에 저장됩니다. 이 저장 동작은 SecurityContextPersistenceFilter를 통해 이루어지며, 인증이 성공하면 자동으로 세션에 저장되어 이후 요청에서도 인증 상태를 유지할 수 있습니다.
하지만 requireExplicitSave(true)로 설정하면, 자동 저장을 하지 않겠다는 의미입니다.
즉, 명시적으로 SecurityContext를 저장해야만 인증 상태가 유지됩니다.
명시적 == 내가 시킨일이 아닌것은 하지않겠다는것 , 내가 명시하지않은것은 하지않는다.
CustomAuthenticationFilter & SecurityContextRepository
커스텀 한 인증 필터를 구현할 경우 인증이 완료된 후 SecurityContext 를 SecurityContextHolder 에 설정한 후 securityContextRepository 에 저장하기 위한 코드를 명시적으로 작성해 주어야 한다
securityContextHolderStrategy.setContext(context);
securityContextRepository.saveContext(context, request, response);
securityContextRepository 는 HttpSessionSecurityContextRepository
혹은 DelegatingSecurityContextRepository 를 사용하면 된다
SecurityContextRepository의 역할
- SecurityContext를 저장:
- 요청이 완료된 후, 현재의 SecurityContext (사용자의 인증 정보, 권한 등)를 세션이나 다른 저장소에 저장합니다.
- 기본적으로 로그인한 사용자의 인증 정보가 담긴 Authentication 객체를 저장하여, 이후 요청에서도 이 정보를 사용해 인증 상태를 유지할 수 있게 합니다.
- SecurityContext를 복원(로드):
- 새로운 요청이 들어오면, 세션이나 다른 저장소에서 이전에 저장된 SecurityContext를 가져와 SecurityContextHolder에 설정합니다. 이를 통해 사용자는 매 요청마다 다시 로그인할 필요 없이 인증 상태를 유지할 수 있습니다.
- 명시적으로 저장된 정보 관리:
- SecurityContextRepository는 필요에 따라 보안 컨텍스트를 명시적으로 저장하거나, 복원하는 동작을 개발자가 제어할 수 있도록 돕습니다. 예를 들어, requireExplicitSave(true)로 설정된 경우 자동 저장이 되지 않으므로, 개발자는 명시적으로 SecurityContext를 저장하는 로직을 추가해야 합니다.
Spring Security에서 Supplier는 지연 로딩을 지원하는 함수형 인터페이스로 사용됩니다.
이 인터페이스는 자바의 java.util.function.Supplier<T>와 동일하며, 인자를 받지 않고 결과를 반환하는 메서드를 제공합니다.
Supplier는 결과값을 필요할 때 계산하거나, 자원을 나중에 로드하기 위해 사용됩니다.
Spring Security에서 Supplier의 주요 역할
Spring Security에서 Supplier는 보안 관련 객체나 데이터를 지연하여 초기화하는 데 주로 사용됩니다.
즉, 필요할 때만 객체를 생성하거나 계산할 수 있게 합니다.
이는 성능 최적화나 보안 객체의 초기화 시점을 제어하기 위해 유용합니다.
예를 들어, Authentication 객체나 사용자 정보, 권한 정보 등을 요청이 들어올 때까지 바로 계산하지 않고,
필요할 때만 Supplier를 통해 동적으로 로딩할 수 있습니다.
Supplier가 사용되는 주요 예시
1. SecurityContext에서의 사용
SecurityContext는 보통 Authentication 객체를 저장하며, 인증 정보를 관리합니다. 이때 Supplier를 사용해 Authentication 객체를 지연 로딩할 수 있습니다. 예를 들어, 인증 정보가 요청마다 달라질 수 있거나, 성능 최적화를 위해 사용자가 접근할 때만 인증 정보를 생성하고 싶을 때 Supplier를 사용할 수 있습니다.
2. Authentication 객체와 관련된 사용
Spring Security에서 Authentication 객체는 보통 즉시 초기화되지만, 필요할 때만 지연 로딩할 수 있도록 Supplier로 감싸서 사용할 수 있습니다. 이를 통해 인증 정보를 나중에 확인하거나, 조건부로 생성할 수 있습니다.
3. RunAsManager, AccessDecisionVoter 등에서의 사용
보안 정책을 결정하는 여러 컴포넌트들도 Supplier를 사용할 수 있습니다. 예를 들어, AccessDecisionVoter가 특정 요청에 대한 접근을 허용할지 여부를 결정할 때, 필요한 객체를 즉시 생성하지 않고 Supplier를 통해 나중에 로딩하여 사용합니다.
Supplier 사용 예시
Supplier<Authentication> authenticationSupplier = () -> {
    // 필요할 때 Authentication 객체를 생성 또는 반환
    return SecurityContextHolder.getContext().getAuthentication();
};

// Supplier를 사용해 인증 정보에 접근
Authentication authentication = authenticationSupplier.get();
위 코드에서는 authenticationSupplier라는 Supplier를 통해 인증 정보를 필요할 때만 가져오도록 설계했습니다.
즉, 인증 정보를 즉시 로드하지 않고, 필요할 때 Supplier.get() 메서드를 통해 인증 정보에 접근하게 됩니다.
왜 Supplier를 사용할까?
- 지연 로딩:
- 인증 정보나 권한 정보를 미리 생성하지 않고, 실제로 필요할 때 생성함으로써 메모리 및 성능을 최적화할 수 있습니다.
- 조건부 실행:
- 특정 조건에서만 객체를 생성하거나 로딩할 수 있습니다. 예를 들어, 사용자 정보가 필요하지 않을 경우 굳이 로드할 필요가 없으므로 Supplier를 사용해 조건부로 로딩할 수 있습니다.
- 동시성 제어:
- 다중 스레드 환경에서 보안 객체를 안전하게 생성하거나 공유할 수 있도록, Supplier를 통해 객체 초기화 시점을 제어할 수 있습니다.
요약
- Spring Security에서 Supplier는 인증 정보나 보안 관련 객체를 필요할 때 동적으로 생성하거나 로딩할 수 있도록 하는 함수형 인터페이스입니다.
- 주로 지연 로딩을 지원하며, 성능 최적화와 동시성 제어에 유용합니다.
- Supplier는 인자를 받지 않고 값을 반환하는 인터페이스로, Supplier.get() 메서드를 통해 값에 접근할 수 있습니다.
public class CustomAuthenticationFilter extends AbstractAuthenticationProcessingFilter {
    // Jackson 라이브러리를 사용하여 JSON 처리를 위한 ObjectMapper 생성
    private final ObjectMapper objectMapper = new ObjectMapper();

    // 생성자에서 /api/login으로 오는 GET 요청을 처리하는 필터로 설정
    public CustomAuthenticationFilter(HttpSecurity http) {
        // /api/login 경로로 들어오는 GET 요청을 처리하기 위한 설정 (로그인 요청)
        super(new AntPathRequestMatcher("/api/login", "GET"));

        // SecurityContextRepository 설정: 세션, 요청 속성 등에서 인증 정보를 저장하거나 불러오기 위함
        setSecurityContextRepository(getSecurityContextRepository(http));
    }

    // SecurityContextRepository를 가져오는 메서드
    private SecurityContextRepository getSecurityContextRepository(HttpSecurity http) {
        // HttpSecurity에서 공유된 SecurityContextRepository 객체를 가져옴 (이 객체는 인증 정보를 저장/복원함)
        SecurityContextRepository securityContextRepository = http.getSharedObject(SecurityContextRepository.class);

        // 만약 SecurityContextRepository가 설정되어 있지 않다면, 기본 저장소 설정
        // HttpSession과 Request Attribute를 사용해 SecurityContext 저장
        if (securityContextRepository == null) {
            securityContextRepository = new DelegatingSecurityContextRepository(
                // HttpSessionSecurityContextRepository: 세션에 SecurityContext를 저장
                new HttpSessionSecurityContextRepository(),
                // RequestAttributeSecurityContextRepository: 요청 속성에 SecurityContext를 저장
                new RequestAttributeSecurityContextRepository()
            );
        }
        return securityContextRepository;
    }

    // 필터의 핵심 메서드로, 인증을 시도하는 로직
    @Override
    public Authentication attemptAuthentication(HttpServletRequest request, HttpServletResponse response)
            throws AuthenticationException, IOException {

        // 요청에서 'username' 파라미터를 가져옴
        String username = request.getParameter("username");

        // 요청에서 'password' 파라미터를 가져옴
        String password = request.getParameter("password");

        // UsernamePasswordAuthenticationToken 객체 생성 (사용자 입력으로부터 생성된 인증 토큰)
        UsernamePasswordAuthenticationToken token = new UsernamePasswordAuthenticationToken(username, password);

        // AuthenticationManager를 사용해 인증 시도, 인증 성공/실패에 따라 Authentication 객체 반환
        return this.getAuthenticationManager().authenticate(token);
    }
}
커스텀하게 authenticationfilter를 만들었고 세션에 인증을 저장해서 인증상태를 유지하고싶을때
setSecurityContextRepository()를 이용하여 DelegatingSecurityContextRepository를 SecurityContextRepository로 지정해야한다.
@EnableWebSecurity
@Configuration
public class SecurityConfig {
    // SecurityFilterChain 설정 메서드 (보안 필터 체인을 설정)
    @Bean
    public SecurityFilterChain securityFilterChain(HttpSecurity http) throws Exception {

        // HttpSecurity에서 AuthenticationManagerBuilder 객체를 가져와서, 인증 매니저 빌더를 생성
        AuthenticationManagerBuilder authenticationManagerBuilder = http.getSharedObject(AuthenticationManagerBuilder.class);

        // 인증 매니저를 빌드 (이후 인증에 사용될 객체)
        AuthenticationManager authenticationManager = authenticationManagerBuilder.build();

        // HttpSecurity 객체를 통해 보안 설정을 구성
        http
                // /api/login 경로는 모든 사용자에게 허용, 그 외의 모든 요청은 인증 필요
                .authorizeHttpRequests(auth -> auth
                        .requestMatchers("/api/login").permitAll() // 로그인 경로는 인증 없이 접근 가능
                        .anyRequest().authenticated()) // 그 외 경로는 인증 필요
                // 기본 폼 로그인 방식 사용 (기본 설정)
                .formLogin(Customizer.withDefaults())
                // SecurityContext 설정, SecurityContext는 명시적으로 저장하지 않도록 설정 (requireExplicitSave(false))
                .securityContext(securityContext -> securityContext
                        .requireExplicitSave(false))
                // 커스텀 필터 추가, UsernamePasswordAuthenticationFilter 앞에 실행되도록 설정
                .authenticationManager(authenticationManager)
                .addFilterBefore(customFilter(http, authenticationManager), UsernamePasswordAuthenticationFilter.class);

        // 설정 완료 후 필터 체인을 반환
        return http.build();
    }

    // CustomAuthenticationFilter 생성 메서드
    public CustomAuthenticationFilter customFilter(HttpSecurity http, AuthenticationManager authenticationManager) {
        // CustomAuthenticationFilter를 생성하고 AuthenticationManager를 설정
        CustomAuthenticationFilter customAuthenticationFilter = new CustomAuthenticationFilter(http);
        customAuthenticationFilter.setAuthenticationManager(authenticationManager);
        return customAuthenticationFilter;
    }

    // In-memory UserDetailsService 설정
    @Bean
    public UserDetailsService userDetailsService(){
        // 사용자 "user"를 메모리에 생성하고, 비밀번호는 1111, 역할은 "USER"
        UserDetails user = User.withUsername("user").password("{noop}1111").roles("USER").build();
        // InMemoryUserDetailsManager로 반환 (사용자 정보를 메모리에 저장)
        return  new InMemoryUserDetailsManager(user);
    }
}
- .authenticationManager(authenticationManager)를 설정하면, 설정된 인증 매니저는 필터 체인 내의 인증 필터들에서 사용됩니다.
- 각 필터는 필요에 따라 인증 매니저를 필드로 가지고 있어야 할 수 있지만, 기본 제공되는 필터들은 Spring Security의 설정을 통해 자동으로 인증 매니저를 사용할 수 있습니다.
- 커스텀 필터를 구현할 경우, 명시적으로 AuthenticationManager를 설정하거나 주입받아 사용할 수 있습니다.
'인프런 > 스프링 시큐리티 완전 정복 [6.x 개정판]' 카테고리의 다른 글
| 13)세션관리 - 동시 세션 제어 , 세션 고정 보호, 세션 생성 정책 (1) | 2024.10.22 |
|---|---|
| 12)스프링 MVC 로그인 구현 (1) | 2024.10.21 |
| 10) 사용자 상세 서비스 - UserDetailsService , 사용자 상세 -UserDetails (1) | 2024.10.17 |
| 9) 인증 제공자 - AuthenticationProvider (1) | 2024.10.16 |
| 8) 인증 관리자 - AuthenticationManager (1) | 2024.10.15 |


댓글